Full Installation
This guide covers installing Stardust XR packages on various distributions, and building from source.
Fedora and Derivatives
If you already added Terra when setting up the Open XR runtime, you can skip to the install commands below.
Stardust XR is packaged in the Terra repository. If you are using Ultramarine Linux, Bazzite, or Aurora, this repository comes pre-installed, otherwise you will need to add the repository:
Standard Fedora Editions and derivatives can directly install terra-release:
sudo dnf install --nogpgcheck --repofrompath 'terra,https://repos.fyralabs.com/terra$releasever' terra-release
If you are using RHEL10 or derrivative you will need to first the EPEL repos, which may be installed with:
sudo dnf install 'https://dl.fedoraproject.org/pub/epel/epel-release-latest-$releasever.noarch.rpm'
Then install terra-release:
sudo dnf install --nogpgcheck --repofrompath 'terra,https://repos.fyralabs.com/terrael$releasever' terra-release
If you are using a Fedora Atomic Edition or derrivative you will need to run the following command:
curl -fsSL https://github.com/terrapkg/subatomic-repos/raw/main/terra.repo | pkexec tee /etc/yum.repos.d/terra.repo
sudo rpm-ostree install terra-release
Then, run this command to install all Stardust XR packages:
sudo dnf group install stardust-xr
If using a Fedora Atomic/Universal Blue based image, run the following command to install all Stardust XR packages:
sudo rpm-ostree install stardust-xr-armillary stardust-xr-atmosphere stardust-xr-black-hole stardust-xr-comet stardust-xr-flatland stardust-xr-gravity stardust-xr-magnetar stardust-xr-non-spatial-input stardust-xr-protostar stardust-xr-server stardust-xr-telescope

Arch Linux
paru -s stardust-xr-armillary stardust-xr-atmosphere stardust-xr-black-hole stardust-xr-comet stardust-xr-flatland stardust-xr-gravity stardust-xr-magnetar stardust-xr-non-spatial-input stardust-xr-protostar stardust-xr-server stardust-xr-telescope
On NixOS, use the Nix package manager. Make sure flakes are enabled.
nix run github:StardustXR/telescope
From there, you can launch Stardust with telescope, then in another terminal window or tab, run any other clients you need. We recommend flatland and hexagon-launcher.
Manual Build
Make sure all of the repositories that are cloned are on the same branch (e.g. all main or all dev branch) to ensure Stardust protocol compatibility
Server
Clone the Stardust XR Server https://github.com/StardustXR/server
Make sure to check the list of prerequisites. Run cargo build and cargo run in the cloned repo to start the server. As stated above, the Stardust server will simply load in with a black void until clients are loaded in. This behaviour can currently be modified by creating a startup file inside the folder ~/.config/stardust/ to automate the loading in of clients, an example of which is shown here, and an example of is linked here
Clients
After the server is running, you'll need to run some clients. Clone any of these, cargo build & then cargo run after the server is already running, and they will load into the Stardust server!
Non-exhaustive list of clients:
- armillary:
https://github.com/StardustXR/Armillary
A 3D model viewer for Stardust XR; rotate, move, and display models in your XR space - atmosphere:
https://github.com/StardustXR/atmosphere
3D environment with natural momentum-based movement - black hole:
https://github.com/StardustXR/black-hole
Universal minimization of Stardust objects - comet:
https://github.com/StardustXR/comet
Write in 3D wherever you want amongst your other apps! - flatland:
https://github.com/StardustXR/flatland
3D panel UI (like window manager) for interacting with all your 2D apps - gravity:
https://github.com/StardustXR/gravity
Launch programs with a certain offset in 3D space - magnetar:
https://github.com/StardustXR/magnetar
Example workspaces client - non-spatial-input:
https://github.com/StardustXR/non-spatial-input
Provides utilities to port keyboard, mouse, and other input methods like libinput into Stardust XR - protostar:
https://github.com/StardustXR/protostar
App launcher library and examples including futuristic Hexagon Launcher
Installation Script
If you have all the correct dependencies, we've created a script that will automatically git clone all of the necessary repositories, cargo build all of them, and give them a symlinks for running the server and clients from the command line. It also creates a config file that will by default install the default atmosphere background. Run the script with flag -nobg if you don't want that.
After Installation
You can either use Telescope to launch the Stardust XR server and a small selection of clients (telescope in your terminal, or telescope -f for flatscreen mode), or you can run the server directly, which only provides a void by default, as there are no applications or clients within it. You can then launch any combination of the clients (listed above), as they are all considered separate items but can run concurrently inside Stardust.
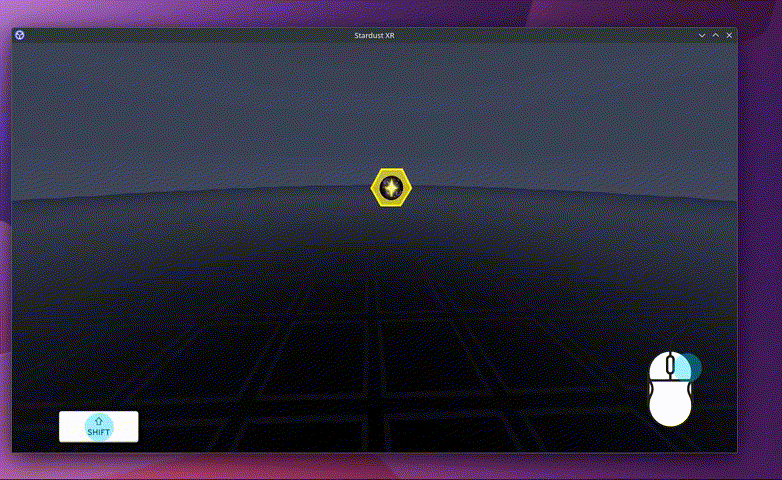
You will see a floating hexagon with the Stardust XR logo in the center, this is Hexagon Launcher.
To move around, hold down Shift and W A S D, with Q for moving down and E for moving up.
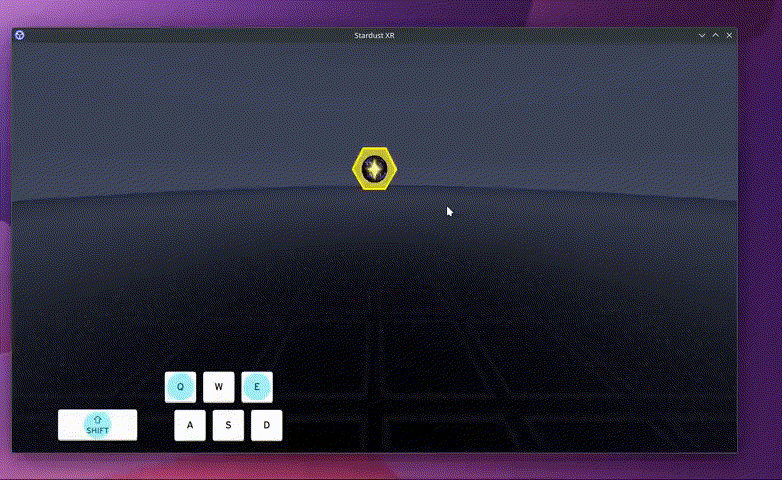
To look around, hold down Shift and Right Click while moving the mouse.
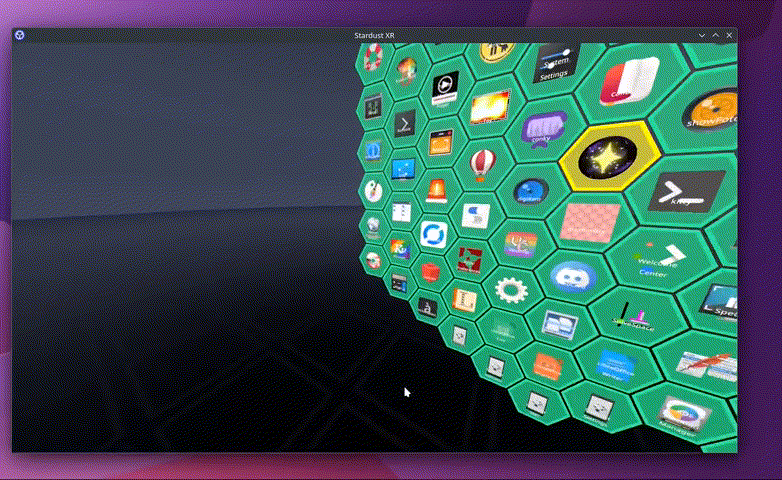
If you click on the hexagon, the launcher will open. Try dragging one of the apps with Shift + ~. The small minus sign is Black Hole, if you click it, it will grab any open window and store it away. Click it again and they will return to their original location.
If you are already using OpenXR within Linux, running telescope while OpenXR is running should launch Stardust on your headset. If not, check further instructions for setting up OpenXR.